Quick note: Morezmore is now on Instagram – morezmorestudio
Another quick note: We sell everything I use here. So if you see something useful, get it from Morezmore.
I am working on a new puppet commission: Murdoch, old salt seaman. The story takes place on a 19th century whaling ship Meduza.
Murdoch will star in the film “The Iron Leech” by Workshed Animations.
This time I am allowed (and encouraged!) to share my progress photos.
Stay tuned, if you would like to see the entire process of making a puppet from scratch – from sketch to the last button on his coat. I think It will be fun.
Reference images that I got from client:
 .
.
First pencil sketch in full size (10.5″ or 27 cm)
 .
. .
.
And finished drawing on Procreate.
 .
.
Outline
 .
.
First assembly – basically, just trying to fit everything I need to fit into the outline.
 .
.
Breakdown of all the parts used.
 .
. .
.
Threadlock
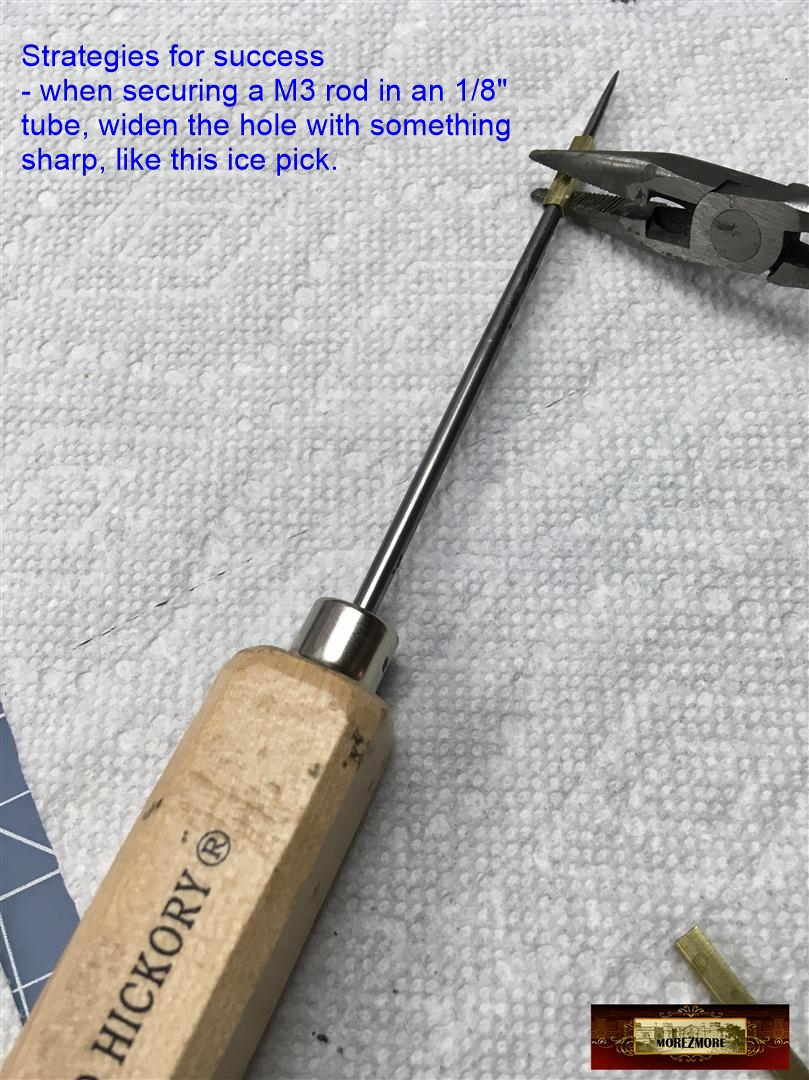
Strategies for success:
– before applying threadlock, clean all the thread with alcohol from machine oil, steel dust, finger oil
– mix threadlock epoxy well
 .
. .
.
– use 2 sets of pliers to tighten the connection, your hands are not strong enough. No, they are not.
– when securing a M3 rod in an 1/8″ tube, widen the hole with something sharp, like this ice pick.
 .
. .
.
– when securing a M3 rod in an 5/32″ tube, fill the tube hole with threadlock epoxy, insert M3 rod into the tube, “bite” on the tube 2-3 times with wire cutters to make the grip stronger.
 .
.
– after the components are threadlocked, leave them alone overnight (or at least 12 hours). No twisting, no testing, no touching, no “I am just looking” until next morning.
 .
.
First assembly of Murdock.
He is 10″ at the moment, requested height is 10-11″, with the head, the shoes and the hat, he will be around 10.5″-11″
 .
. .
.
.  .
.
 .
.  .
.
 .
.
More tinkering – added a joint into each shoulder. Murdoch is a man of labor so I decided that he will benefit from extra flexibility in his shoulders.
 .
. .
.
Armature for clay hands which will be used to make the mold which will be used to make silicone hands.
Finger wire (cotton covered wire), sewn together into a hand skeleton.
 .
. .
.
A layer of liquid sculpey to saturate the cotton on the wire. This is to make clay stick better to the wire.
 .
. .
.
A layer of liquid sculpey on the wooden ball. Again, to make the clay to stick to the wood.
And bake.
 .
. .
.
Murdoch’s hands – ready to bake.
 .
. .
.
Rough clay sketch for Murdoch.
He started to look like a rather nasty geezer, so I decided to stop and check with film makers about the desired personality. Maybe I should go for a more lovable look. Or maybe not, who knows. From the script fragment that I got it was not very clear.
Or, yeah, and if they allow me to give him a earring.
 .
. .
.
 .
. .
.
 .
.
 ..
..
Second sketch of Murdoch’s face. Got more good info about the character from filmmakers and made the changes. Murdoch is a character in a drama, without any funny components.
 .
. .
.
 .
. .
.
 .
.
Final head – already baked.
Made out of Cosclay polymer clay – fresh out of the oven. I love it, both the clay and the head.
Cosclay Warm Beige from Kickstarter Dollmaker’s Pack
 .
.  .
.
 .
.  .
.
 .
.  .
.
Murdoch’s head, made out of Cosclay polymer clay – fresh out of the oven. I love it, both the clay and the head.
Cosclay Warm Beige from Kickstarter Dollmaker’s Pack
Now – the molds
We sell everything that I use. So, if you see something useful, head to morezmore.com.
 .
.  .
.
 .
.  .
.
 .
.  .
.
 .
.
Murdoch looks like he is already tired of this bulls..t
 .
. .
.
 .
.
Vaseline petroleum jelly for release
 .
.  .
.
 .
.  .
.
 .
.  .
.
 .
.
Ultracal 30 (ratio 38 water: 100 ultracal)
3 times
114 gram water and 300 gram ultracal
 .
. .
.
 .
. .
.
 .
. .
.
Tap on box to make the bubbles float to the surface
Both parts are done. Here is 4 videos of opening the mold for the first time:
Same way – the second part of the mold
 .
. .
.
 .
.
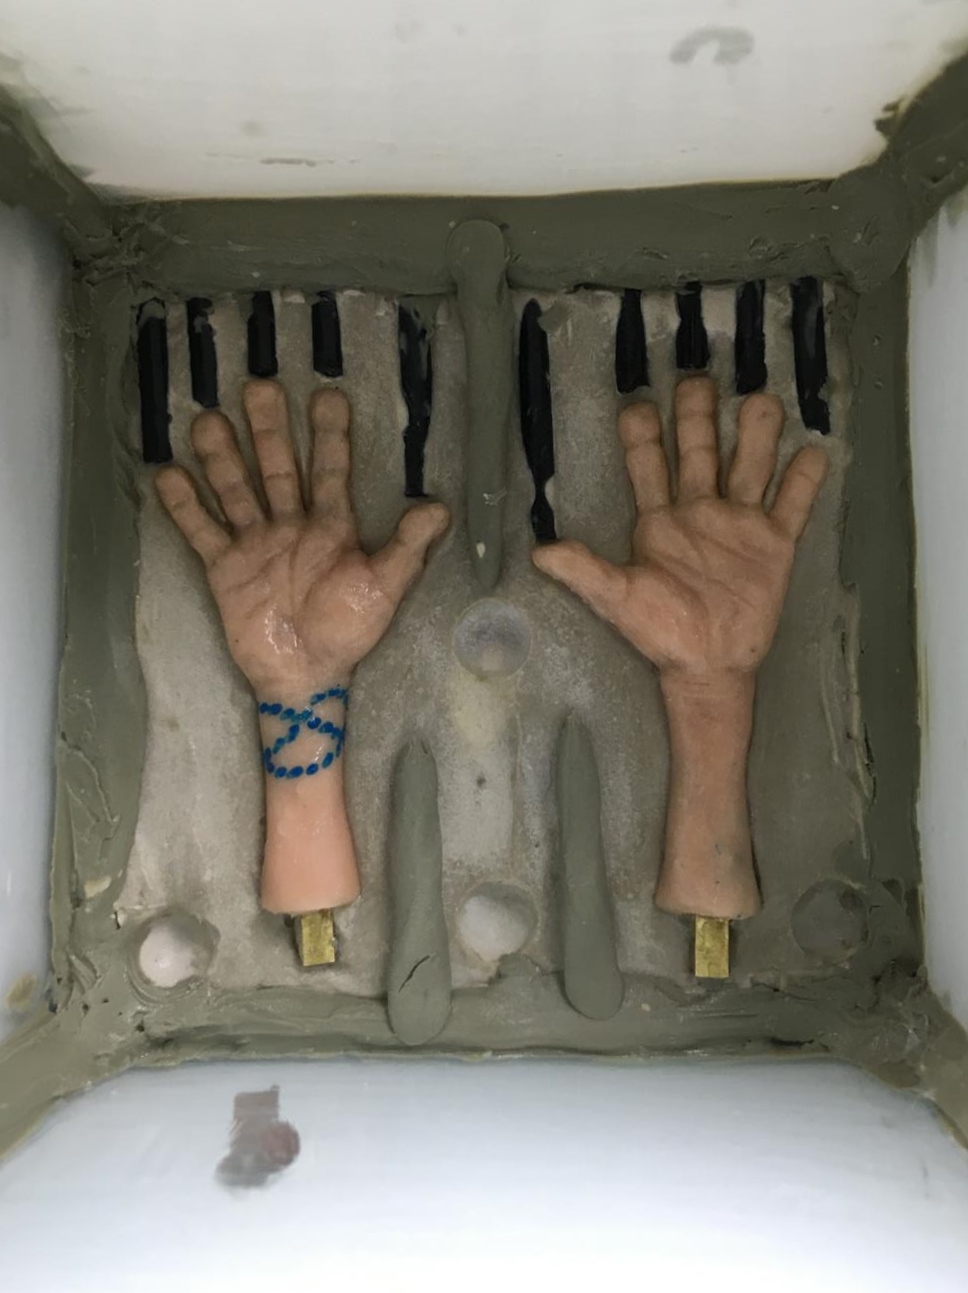
Hand armature – pipe cleaners wire as it comes
 .
. .
.
Trimmed
 .
. .
.
Sewn together with household cotton thread. Plus styrene tubes – to avoid banana fingers
 .
.
Tatoo.
I had a clever plan to paint the tattoos with acrylic and embed them between the layers of silicone. I wanted to use acrylic paint because I would have had more time to paint without rushing to beat the silicone curing time. But that plan failed, so I ended up using intrinsic painting method with silicone and silicone pigments. That means painting the tattoos within 6 minutes silicone curing time.
 .
.  .
.
 .
.  .
.
The jar of premixed part A + acrylic beige. This jar is your friend. Just take a bit from it, add Part B and you will have the consistent color for the first thin “beauty” layer, secondly, for the main casting and thirdly for touch up/repair. I premixed 30 gram of Part A and it was plenty for 2 pairs of hands.
Take a bit of premixed colored Part A, add equal amount of Part B – for the first thin “beauty” layer.
 .
.  .
.
Naphtha makes the silicone more runny, but does not delay the curing (alas)
Paint thin “beauty” layer over the tattoos.
 .
.  .
.
Paint armature with the remaining silicone – let the silicone soak into the fuzz on the pipe cleaners – for a better adhesion of the armature to the silicone.
 .
.
Mix about 10 gram of premixed Part A with 10 gram of Part B.
Fill the mold, place the armatures, pile up the silicone (overfill), close the mold and press together.
No photos of this step because I was in a hurry to beat the silicone curing time and forgot.
 .
.
Here we are, not too bad.
 .
.  .
.
Trim with scissors.
 .
. .
.
 .
.
Patching – repair – touch up – cover the seams:
Take a bit of premixed Part A, mix with equal amount of Part B, mix and fix everything you don’t like
 .
.  .
.
 .
.  .
.
After curing, the touch-up spots will be shiny. Brush some Novocs matte (or corn starch or baby powder) to remove the shine. Corn starch and baby powder work somewhat ok, Novocs Matte works better.
 .
.
 .
.
 .
. .
.
Overall – I am happy with these hands. Not perfect but I am getting better at this.
Continues on Part 2.

Is the thing you used for the back is that to get more movement or just a different height?
LikeLike
it is flexible, somewhat like human spine
LikeLike
Will he be getting his own kit?
LikeLike
I don’t have some parts to make kits, so the kits are suspended until my delivery channels are working again.
LikeLike
Oh well that is unfortunate but I hope they come soon
LikeLiked by 1 person
He’s looking really good I really like the sculpting work on he’s head and head
LikeLiked by 1 person
Thank you very much
LikeLike
Also are you sill going to able to do that job for me around July?
LikeLike
just hands? no, too boring, I am sorry…
LikeLike
Is there something I could do to make it less boring?
LikeLiked by 1 person
You said it takes 1 or 2 months to film so when that one with Henry is finished filming can you tell me so maybe you could send me mold?
LikeLike
Maybe. I got a lavish praise for Henry and a promise that they will start filming soon – that was in January. So I don’t know what is happening with Henry.
LikeLike
How big is the production? If it’s like laika it could take years
LikeLike
I am under non-disclosure agreement with Henry.
LikeLike
So when they are done with filming can I have the mold? 1000 or 1200 is a lot out of my budget
LikeLike
I don’t know.
LikeLike
Ok well when you decided let me know
LikeLiked by 1 person
Also when will the cave explorer kit be back in stock?
LikeLike
The introductory period is over and all kits are discontinued, just parts and instructions now. I will post new ideas and add new parts, but no kits anymore.
LikeLike
Why no kits?
LikeLike
The kits were meant to be an introduction, now people got the idea and just get the parts to build their own.
LikeLike
But isn’t the only difference that it’s more complicated?
LikeLike
I also think that might cause new comers and people who just want to go in and get one thing to go to different armature stores
LikeLike
Is there any possible way to still get the kits? Getting the parts separated from each other kind of stresses me out
LikeLike
I cannot meet the demand for kits. It was a hard decision, but there is only 24 hours in a day.
LikeLike
Well I guess it will encourage people to be more unique
LikeLiked by 1 person
The tattoos look really good
LikeLiked by 1 person
👏🏻👏🏻👏🏻That was really good
LikeLiked by 1 person
Are the kits? back because I noticed that it says some of them are still in stock
LikeLike
not yet. One kit is still in stock – remaining couple of kits
LikeLike
So will anymore of them be back?
LikeLike
Yes, when I have components, expecting them in about 2-3 weeks.
LikeLike
NICE! I hope to be getting ether one or two of the cave Miner armature
LikeLike
[…] Continues from Part 1 […]
LikeLike
[…] Continues from Part 2 […]
LikeLike
Which square tube did you use for his leg?
LikeLike
5/32″ + 1/8″ telescopic. Here is the parts breakdown:

on this page:
LikeLike
THANKS! also would it work if I put it with the cave miner armature?
LikeLike
Yes! Everything works with everything, as long as you choose M2 or M3 and stay with it.
LikeLike