I promised in the previous post that I would make a special step-by-step post about hands on cotton-covered wire armature. Here it is. The hands on the pictures are for a doll in 1/6 scale (11.5″, 29 cm), but this method can be used for any size.
Tools and materials used:
– cotton-covered wire
– brass tubing 1/8″
– tubing cutter
– polymer clay
– Translucent Liquid Sculpey
– polymer oil
– convection oven Deni 10400
– oven thermometer
– clay cutter
– “That’s the One” tool
– fine point dental rubber tool
– X-Acto knife
– pointed spatula
– flat clay smoothing brush
– fine point clay smoothing brush
– ball-point stylus tools in different sizes
– miniature fingernail tool set
– long-nose pliers
– wire cutters
– fine abrasive sanding mesh 180 grit
******
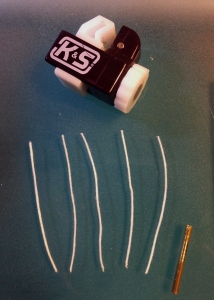
This is a group photo of all the tools that I used.
This is a photo of cotton-covered wire 30 ga.


It is very soft, but holds the shape nicely. The clay sticks to the cotton very well, so that the clay does not slide off the wire (rather maddening experience when you are dealing with a 10 millimeter finger.
I cut 5 pieces of wire and a piece of 1/8″ brass tube (hand module) with a wire cutter.


Bouquet of wires goes into the tube.
Pinched the end of tube to secure the wires.


Arranged the fingers into a palm tree leaf and painted each wire with translucent liquid sculpey.
Collected the fingers together and painted heavily the place where the palm will be.


Baked first time.
Put some clay on both sides of the armature and started making the palms.


Making the palms.


Baked second time.
Started making fingers one by one. You can push other fingers out of the way.


While working on fingers, had an idea on how to make it easier: How about:
1) making the phalanges of the fingers (little sausages)
2) baking the sausages
3) positioning the fingers as needed
4) covering up the joints.
Tried it. That idea has definitely lots of potential. Only not three phalanges, but two, because I need the clay on the fingertips unbaked for final detailing, for example fingernails.
Baked third time.


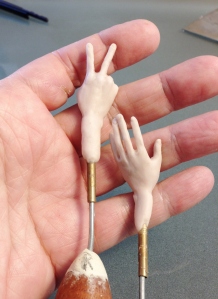
Nice to be able to pose the hands without ruining all the work I have just done, as it happens with the unbaked clay fingers. The sausages give a very good idea of how the hand should look, unlike wire.


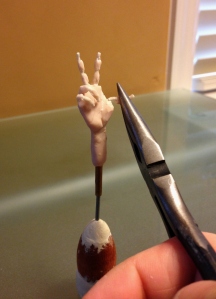
After the hands are posed – I sculpted the fingers as usual. “As usual” means adding one tiny bit of clay at a time, smoothing it, shaping it with tools, one finger after another – long and tedious work. But this time the task was much easier – all that was needed is covering the joints and sculpting fingertips.
Here comes the 3-piece fingernail set by Alex Mergold. Perfect for 1/6 scale. 2 mm tool for thumb, 1.5 mm tool for index, middle and ring fingers, 1 mm tool for pinky. Yes, we sell it – see the link above.


Gently painted with translucent liquid sculpey to cover the micro cavities and cracks in the clay and generally smooth things over.


Great method, I am very pleased with it and happy to share it with you.
A good consideration point from Bev and some additional brainstorming:
-
Bev Gelfand: Neat – I’ve been working on a similar format, but the separate phalanges for posing is a great idea. How many more times do you think you can bake these past four? I mean, if you’re baking them four times before even adding them to the rest of the sculpt, that means a minimum of two more bakes – do you feel they’ll put up with it, or begin to become brittle/crumbly) or discolor (problems I’ve noted from baking too many times)?
-
Natasha Nazarova: Good point. Don’t count the first bake – it is only translucent liquid sculpey. Three bakes. Also these three bakes do not have to be real bakes, perhaps less time, less temperature – to go easy on them. Also, these are for the scenario when the hands are added at the last time – for the last two bakes (“everything together” bake and “skin” bake). That is my thinking – I will try it and let you know.
-
Natasha Nazarova: Another idea – the palm and the phalanges-sausages can be done together for one bake. That cuts it down to 2 bakes.
-
Bev Gelfand Ah, that’s good. Up to the 2nd bake, add it to the figure, seam the arm and finesse the hands, third bake (presuming you do this at the same time as adding the feet/legs, so they’re in on the third bake). That leaves one final bake for corrections or TLS layer. *nods* yeah, that should work. Now if only I could figure out how to get a true non-shine matte finish. My TLS leaves a slight sheen, makes them look like oiled down/sweaty beach bodies. Maybe it’s just too old and I need fresh.
-
Natasha Nazarova I don’t mind TLS sheen, big improvement from what I get without it! 🙂 But of course, would be better if it were true matte, I agree.


[…] The cotton-covered wire arrived and I made the pair of hands and wrote the step-by-step post about it. Here it is: Cotton-Wire Hand Armature for OOAK Doll […]
LikeLike
Thank you for these tutortorials. These are wonderful.
LikeLiked by 1 person
Thank you so much. I can’t wait to try. Wonderful tutorial! Carol Whelan
LikeLiked by 1 person
[…] got a simple thin layer of clay. The arm modules got finger armature (for details please see Cotton-Wire Hand Armature for OOAK Doll The head module got a small knob on the back of the head. These things are to make my future […]
LikeLike
I have an off-the-wall question. I work by wool felting. My guy has fingers now but I used readily-available florist’s wires and felting onto a surface with no “grip” has meant that sometimes his fingers begin to sort of unravel. I did not know about the cotton-covered wire. (This would also do well in making his cat more realistic, and I might attempt a dog.) I am dissatisfied enough that I am considering re-doing his entire body as he is just under 1/6 scale and based on a real person, who in RL is fairly tall. [6″3″] In your opinion, do you think the cotton wire would hold up to the needle-felting process? Don’t worry, I won’t hold you to it, You’ve probably never needle-felted. I’m thinking one of your fans might have, though – or someone knows of a needle-felting blog.
Thanks for any response! Suze
LikeLiked by 1 person
Hi, Suze, I think it will hold up. It is the same problem with clay – clay just slides off the smooth naked steel wire, no grip. Cotton surface helps with the grip and I think, it will help with wool too. Give it a try, you might love it, like I do. Thank you.
LikeLike
[…] MODULES Tool and Materials on the photos More detailed description of hand armature is HERE – brass tube – square 1/8″ – to make the second part of the modules – […]
LikeLike
[…] hands are made of finger wire on steel balls. The wrists have round magnets with a hole inside. This makes the wrists rotate 360 […]
LikeLike
I think you are incredible and I am very happy that you have decided to make the armatures and affordable . I an definitely a beginner and love making especially fairies I had almost everything , tools boxes if different color clay armatures 3D molds but due to life I lost my storage unit and lost everything I own and I lost my home so I am starting life over and not at a young age but ok well I will get a piece or two as I can afford , but I just think you are amazing 🎇
LikeLike
Thank you, Joyce! I went through something similar several years ago – lost everything and started from scratch. Morezmore was born at that time.
LikeLike
[…] clay. The arm modules got finger armature, made with cotton-covered wire (for details please see Cotton-Wire Hand Armature for OOAK Doll). The head module got a small knob on the back of the head. These things are to make my future […]
LikeLike
Hi Natasha. I have the cotton covered wire, but it seems to unravel where I’ve made my cuts. Can I put something to prevent this? I’ve tried several times and wind up frustrated each time..
LikeLike
a bit of glue! 🙂
LikeLike
Thanks Natasha.. I will try that.. I bought the covered wire from you a while back and just didn’t know how to use it.. LOL
LikeLiked by 1 person