

Morezmore OOAK Doll #19
8″ tall, total height of the sculpture with the base 9.5″.
Materials used: Puppen Fimo polymer clay, tibetan lamb in Auburn Brown, Liquid Fimo, Genesis paints, microbeads, silk gauze, gold tulle, manzanita wood burl, faux moss, brass tubing 3/32, steel wire 17 and 24 gauge, Magic sculpt epoxy, Sakura 3-D Crystal Lacquer, Pearl-Ex powders, Fabri-tac, felt.
***
I am starting a new sculpt “The Mistress of Copper Mountain”. For now, I am collecting the materials, refreshing it in my memory – this is from one of my childhood books. In a nutshell, it is a mythical female entity who appears as a beautiful enchantress or a lizard.
Here is an outline of the legend:
Once there lived a very skillful young man called Danila, he was very skillful in making things of stone. People called him a real magician of his craft as he created real masterpieces. Danila had a bride, Katya and they loved each other very much. Everything in their life was good and peaceful until Danila came to the copper mountain for some stone to continue his work.
That mountain has been always connected with some strange things and mysteries and the local people believed in a legend about the mistress of the copper mountain, who lived inside. She was an enchantress and she could turn into a lizard or just disappear, so she used to play some wicked tricks with people. Besides, she had a magical beauty. But when she saw Danila, a young handsome man, she liked him and she wanted him to work inside of her mountain. She tried to charm him, to entice him with her magic tricks and Katya begged him to stay with her, but in vain. Danila’s fanatic passion for his skill made him choose the copper mountain and one day he just disappeared inside of it.
It was rumured in their village that Danila was dead, but poor Katya didn’t believe it and expected him to change his mind and come back to her. One day she was walking in the forest and she decided to go to the copper mountain. When Katya came, she was so desperate and miserable that tears began pouring down her cheeks and she continued crying until she heard Danila’s voice. She couldn’t see him, but she could hear that he was calling her, so she began to call him too. But suddenly instead of Danila she saw the Mistress of the copper mountain. The Mistress was very angry and said that she wouldn’t let Danila go. But Katya insisted and Mistress suggested that Danila himself should decide whether to stay or to leave the mountain, but the only condition was that if he chose Katya he would lose his talent. It was so difficult for Danila to make his decision because he loved both his skills and his bride. But finally he said that he chose Katya because he loved her very much and he couldn’t stop thinking about her all the time being in the mistress’ possession. The mistress of the copper mountain was so impressed by the power of the human love that she allowed them to leave.
*****************
Tools and materials:
– brass tubing 3/32″ and 1/16″
– tubing cutter
– needle files
– magic smooth epoxy gel
– toothpicks
– long-nose pliers
– manzanita base with hole drilled in it
– proportions image (laminated with scotch tape)
– steel wire 17 ga
– thin wire steel 24 ga
– wire cutters
– Fabritac glue
– artificial moss
– artificial grass
– disposable spatulas
– microbeads.
*******************************************************************
Cut some pieces of manzanita that I am going to use for the base.

With a few additional cuttings, it looks more complete. Nothing is attached yet, I am just putting things together and brainstorming.

The Magic Drawer…

produced these:

After some demolition work with a hammer and pliers, I got a bunch of nice looking “stones, gems and minerals”, which I am going to work into the base. The Mistress’ appearance should be accompanied by a tasteful display of hidden underground treasures of the Copper Mountain.

I happened to have an 8″ tall modular armature laying around which I made a while ago, it will be perfect for this sculpt. I will need to chop the wire on one of her legs and add brass tubes to make her stand on the base. Also, I need to cut the tubes for her hands modules. The head module is already there, it is removable. Once I am certain of the pose, I will seal the joints with epoxy to freeze the armature in the pose.
The armature is made with 17 gauge steel wire, wound together with 24 gauge steel wire, then covered with Magic Sculpt. The tubing for the leg will be 1/8″. The hand modules will be 3/32 tubes. The head module is 3/32″ tube, covered with 24 GA steel wire and epoxy, it fits 17 gauge steel wire and easily slides on and off. It will need to be secured later with Magic Smooth epoxy.

The hand tubes I mentioned earlier are hand modules – I will make them separately, bake, then slide on the arm wire like gloves. The hand tubes come to the elbow and are eventually secured in place with Magic Smooth. It is easier for me to make and bake hands modules (and head module and feet modules) separately. It is ok to mess up and start again, for example. It is also easier to position the modules just right – the module will rotate on the wire, until I secure it with epoxy. The same with head modules and feet modules. I make them all separately and when I am pleased with all, assemble them together and sculpt over the connections.
Ok, here we go. Step by step instructions on how to make a sculpt stand by using a base and leg tube construction.
The main idea is to attach a tube to the leg of the armature and secure a telescoping tube in the base. The base tube fits into the leg tube. The finished sculpt has only a small hole in the bottom of the foot. The tube going up the leg and the snugly fitting telescoping tube installed in the base make it possible for a sculpt to stand upright securely and firmly and without wobbling, and to be removed and reinserted, telescoping tubes nicely and smoothly sliding in and out. Something like this:


It is simple, but takes a bit of work. Here on the picture you can see all things collected, namely:
– armature with the weight-bearing leg wire cut off
– about 0.5″ piece of 3/32 tube (intermediary tube – for snug connection)
– an above-the-knee-high piece of 1/8 tube (leg tube)
– my manzanita base with the hole drilled
– about 0.75″ piece of 1/8 tube (another intermediary tube for snug connection – it goes inside the hole in the base, my base is about 0.75″ thick)
– an under-the knee-high piece of 3/32 tube (base tube)
– tubing cutter, pliers, toothpicks, etc.
– Magic Smooth epoxy ready to mix (You have to measure and cut and prepare all your metal pieces so that everything fits and is of the correct length before mixing the epoxy, as it starts curing immediately after mixing)
Securing the base tube into the base.
The small piece of 1/8 tube (intermediary tube) is not always necessary but it might be helpful if the drill makes a hole which is a bit too large for the tube. That is what happened here. That intermediary piece of 1/8 tube makes the connection more snug. Anyway, fill the hole with Magic Smooth goo with the help of a toothpick, insert a small piece of 1/8 tube into the hole, stuff a bit more Magic Smooth into that little piece of tube, insert the 3/32 base tube.
Make sure it is not sticking out on the bottom (if the hole goes all the way through the base). Wipe out the area around the tube, leave it alone to cure. That is all for the base tube.
A side note. On the picture you actually see a rod in the base, not the tube. Same idea. I just had a leftover piece of the rod and wanted to put it to use.

Attaching leg tube to the leg.
The leg wire is gauge 17 steel wire which fits snugly into 3/32 tube. That is the reason for a small piece of 3/32 intermediary tube – just to make a snugger more secure connection between the leg wire and the 1/8 leg tube. Anyway, spread Magic Smooth over the wire, put a small piece of 3/32 tube over the wire, spread more magic smooth over the piece of 3/32 tube, put 1/8 leg tube. Make sure both legs are of the same length, smoothen magic smooth all around with a wet finger and leave it alone to cure. That is all for the leg tube.

The leftover mixture of Magic Smooth went to “freeze the joints” in the armature and glue together the wood pieces on the base. Here is what I have now:

About cutting the tubes with the tubing tubing cutter
After a piece of tube is cut off with a tubing cutter, the tube opening is smaller (inevitable because the cutter blade pushes the walls inward). It needs to be widened up to accept the telescoping tube. You can do it with any sharp metal point, the ones I tried were an ice-pick and a needle file. Insert the point inside the tube opening, tap, rotate and work it open. I like needle file, because it sort of files and smoothes the edges as it is rotated inside the opening.
If the outer edge of the tube needs to be corrected, a regular metal file does the job. Keep epoxy away from the sliding surfaces of the tubes (both the outer and inner surfaces) – try to work clean. If epoxy gets on the tubes outer sliding surface, you can scrape it off later with x-acto knife, but if it gets inside the tube and hardens, nothing can be done, you will have to start all over. If not clear, you can ask me a question in the comments area, I will be happy to clarify. English is not my native language, so it is possible some of the things are not as clear written here as they are in my head.
Continuing next day.
Did I say “MEASURE EVERYTHING”? Do what I say, not what I do.
Had to reposition the base tube (rod). Ok, this is good now.


This morning I put together the base. It still needs dry brushing with brown oil paint which helps to tie all the components together, hide occasional glue spots, make moss even more natural looking and bring out the character in manzanita. The base also needs a sculpt name plaque and a piece of felt on the bottom, other than that it is complete and it will be drying for a day or so. The moss, gems and gewels and lizards are attached with fabritac glue. I did not make the rubber lizards, just enhanced them with gold pearl-ex powder.


“…Stepan noticed what appeared to be hundreds of lizards all around him – of different colors, green, bluish, brown ones with gold spots. “Don’t step on them!” The strange woman warned, “They are my brothers and sisters. Look how big and heavy you are and they are small”. Stepan couldn’t move until she clapped her hands and the lizards went away..” – Pavel Bazhov, Mistress of Copper Mountain.
I made the head. It is already baked. The clay is Puppen Fimo Rose.


The lizard on the front of the base is gone now – it was somewhat stealing the show. Here is what I have now:

Outfit brainstorming: She will be clothed from neck to wrists, traditional Russian way. I am going to make it in green – malachite greens – that is the main gem in the Ural mountains. The story is a fairytale from that region. Mistress of Copper Mountain is a staple in those fairytales and many of them involve malachite. Also, there is a description of her dress in one of the tales: “Her manner of dress amazed Petrovich, she wore something like a silk dress but apparently made out of malachite stone”. Now how I am going to accomplish that is not clear – right now the idea is to print malachite pictures from the internet and do the Liquid Fimo image transfer and then sort of drape it on her body. Then decorate with microbeads.
She will have the traditional Russian headdress and knee high boots, the sleeves will be sheer green silk gauze with some gold beads and paint swirls, I think. Overall – greens and gold, a lattice beaded forehead cover.
But that is later. For now – hands modules – baked:


Here is what I have now:

These are images of natural malachite stone – for her dress and head dress. I am going to attempt the image transfer with Liquid Fimo.

The image transfer affair went successfully. So I can write the step by step. The credit goes to Roser (roosartstudio) for this tip. So, here you go:
HOW TO TRANSFER ANY IMAGE INTO CLAY
1. Print the image on regular printing paper.
2. Tape the image flat on the piece of cardboard.
3. Paint the image with Liquid Fimo – as thin as possible with complete coverage.
4. Bake – I did 15 minutes at 275 in pre-heated Deni oven.
5. Let it cool – it takes about a minute or two.
6. Submerge in warm water.
7. Start rubbing with your finger on the back side, the paper starts to roll and wash away.
8. Proceed with a toothbrush, gently.
9. Once all the paper goes away, all you have left is thin film of Liquid Fimo with a laser image permanently fused onto it.
That’s about it – if you have questions, you can ask in the comments below, will be happy to answer.
The process reminded me of those rub-away pictures of my childhood. The film is very durable, and it can be transparent or opaque – depending on the image. I have an ok printer HP Laserjet, so the image was of good quality. The film is stretchable and drapeble. It can be cut and taylored. It can be crampled and spread out smooth again. It will assume the shape of the form underneath it. I am thinking about fins and wings and leather and all other cool effects. Have fun!
These are printed images, taped to cardboard and painted with Liquid Fimo, ready to be baked:

This is my malachite “fabric” ready to be tailored, attached to the sculpt and draped into a long dress. I have different patterns for bodice and skirt and for trims and for headdress.

I need to pack and ship purchases, so I am going to stop for today.
With all this cloth making excitement I forgot to mention that I also made her upper body. The body is nothing to write home about, all I needed was just anatomy and curves and general outline. It is not very detailed and it is not going to be sanded either. The chest is “dress shaped”. The malachite cloth will be stretched/draped/fused on it later. Here is what I have now:


She has legs now – feet are shaped as boots that she will be wearing, the head module and hands modules are already attached with Magic Smooth and are curing.


Somebody asked me about how to support a sculpt while baking. With forceps I can suspend in the air just about anything.

Another thing I wanted to share is this hand-made tool. I have been using it for a little while and it started to prove itself very handy. As I had some leftover Magic Smooth this morning, I decided to give it a serious permanent handle. Here you go:
Morezmore Loopy Crease Tool.

Suggested uses:
– eyelid creases – the main reason for me, as the lids came out sort of thick on this sculpt (match the diameter of the loop to the eyelid and press)
– parted lips
– those impossible tiny indentations next to the wings of the nose
– smile lines
– creases behind the ears and inner works of ears as well
– armpits, crotch creases, bend elbow creases, behind, under knees
– palm lines, wrist lines, nailbeads (insert a thick needle into the loop and pull it hard to make a tiny loop), maybe even cuticles.
– feet and toes and lines on the sole, heel creases
To get the needed diameter for the specific task on one of the loops, insert some round handle and pull.
How to make your own – easy! several loops of wire (I used 24 gauge steel wire and 17 gauge steel wire) tied up together, inserted into a handle (metal handle from a ball pen would do great) and epoxied dead.
Mistress was completely sculpted a few days ago.


Face and hands are blushed/painted with genesis paints and heat set by now.


The boot are finished:


And the dress is well on its way. It is made out of silk gauze. Here is what I have now:


All I have left to do is:
Make hair and exhuberant kokoshnik – Russian head dress
Kokoshnik – Traditional Russian head-dress, known since the 14th century (maybe earlier). It has a great number of versions. From 1698-1700, because of the reforms of Peter the Great, traditional Russian costumes (including the kokoshnik) were replaced by European fashions. In 1836, the kokoshnik was reborn (in the reforms of another Tsar – Nikolas I) as part of court ceremonial women’s costume.
Next, I will decorate her entire outfit with blue and green and silver microbeads which will cover up seams and edges on the dress and give her a tall necklace which will be covering most of her neck, finally large long earrings.
Finally, I still need to put a few finishing touches to the base – name plaque and brown oil paint to tie it all together and bring out the colors of the manzanita wood, also add felt on the bottom.
And she will be done.
***
Mistress got hair and kokoshnik. The hair is made out of Tibetan Lamb and is wet on the pictures and will be styled later, kokoshnik will be decorated with microbeads. The dress will be decorated with microbeads as well. Getting there – almost done.


***
I started the microbeads beadwork , it is a simple and relaxing but very long process. Here is the result of this morning:


***
More beadwork this morning:


***
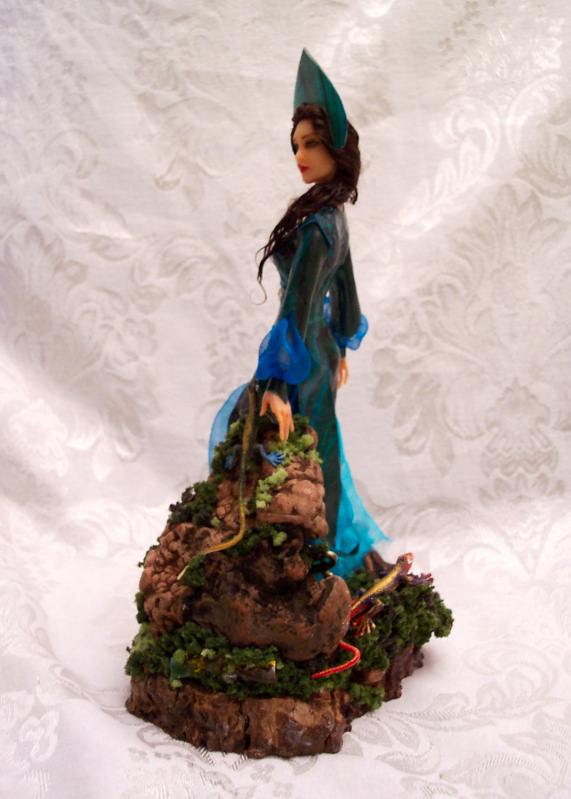
All done! Time for the final 360 degree photo shoot:

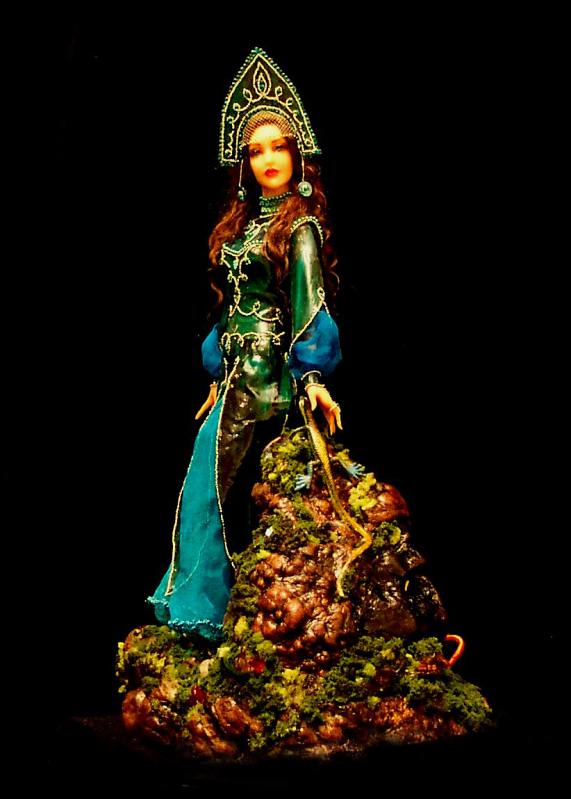


Thank you for watching!
To be continued…

I recently purchased a product called Bondic from a website called “The Grommet”, which markets new and different ideas. It is a liquid plastic welder and looks as though it could be very helpful in doll construction. Love your blogs. Thank you for being so willing to share your knowledge and talent.
LikeLiked by 1 person
Oh, thank you! Will check it out! 🙂
Writing it down.
LikeLike
[…] description of this doll can be found on “a href=”https://morezmore.wordpress.com/2015/04/19/mistress-of-copper-mountain/”>Mistress of Copper Mountain […]
LikeLike
She is beautiful. You are such an inspiration to me. I have just begun doll sculpting and am excited to try your techniques. Thank you.
LikeLike
Thank you very much, Sandra! 🙂
LikeLike
Greetings, incredible work, excellent finishes. a lot of pressure on the details and ending in a great harmony in the setting.
LikeLiked by 1 person
Thank you thank you 🙂
LikeLike